Showing posts with label PHP. Show all posts

Wednesday, August 1, 2018

Contact us form in php

Contact us form in php

In this post we will learn below functionality :

1. HTML UI of contact us page.
2. HTML validations.
3. Manage CSS.
4. Email all details on our email id.

1. HTML UI of contact us page: Here is the example of basic HTML form for contact us page.


      <h2>Contact Form</h2>
<form id="form" method="post" action="contact_us.php">
    <fieldset>
      <label><input name="name" id="name" placeholder="Name*" required type="text"></label>
      <label><input name="email" id="email" required type="email" placeholder="Email*"></label>
      <label><input name="phone_no" required type="text" placeholder="Phone*"></label>
      <label><textarea name="query" required placeholder="Message*"></textarea></label>
      <div class="btns">
        <input class="send-btn" type="submit" value="Send" name="">
      </div>
    </fieldset>  
</form>


Here,
method="post" (To post data on the server by POST method)
action="contact_us.php" (Form data will post on contact_us.php page)


2. HTML validations : Below are the HTML 5 validations which we used in HTML form  
required (This is the required validation of HTML 5)
required type="email" (This is for required with valid email address)


3. Manage CSS: Use below CSS to style your submit button 

.send-btn{
width:100%;
height:30px;
margin-bottom:10px;
background-color: #ff9000;
color: #fff;
border-radius: 10px;
}

4. Email all details on our email id: Create a contact_us.php file and add below code in this file 


$tryAgainUrl="<a href='contacts.html'>Try Again</a>";
if(!empty($_POST))
{
if( $_POST['name'] && $_POST['query'] && $_POST['phone_no'] && $_POST['email'])
{
$name=$_POST['name'];
$query=$_POST['query'];
$phone_no=$_POST['phone_no'];

/* email send code start */
$from="info@yourdomain.com";
$to="support@yourdomain.com";
$email=$_POST['email'];
$subject = 'Contact us query';
$message ="Name : ".$name."\r\n\r\n";
$message.="Email : ".$email."\r\n\r\n";
$message.="Phone No :- ".$phone_no."\r\n\r\n";
$message.="Message :- ".$query."\r\n\r\n";

$headers = "From: $from\r\nReply-to: $email";
$sent = mail($to, $subject, $message, $headers);
/* email send code end */

header("Location: contacts.html"); /* Redirect browser */
exit();
}else{
echo "Invalid Details. ".$tryAgainUrl;
}
}else{
echo "Invalid Details. ".$tryAgainUrl;
}
?>


Here :
mail(to,subject,message,headers);

$to = This is required. (Receiver email address)
$subject = This is required. (Subject of the email)
$message = This is required. (Defines the message to be sent) 
$headers = This is Optional. (Specifies additional headers, like From, Cc, and Bcc)


Thursday, June 14, 2018

How to integrate Paytm Payment Gateway with Codeigniter | PHP

How to integrate Paytm Payment Gateway :


As we know Paytm is highly popular wallet system in india and Now a days it's growing very fast. So here in this tutorial you will learn how to integrate Paytm payment gateway using PHP on your website.

Step 1: Just go on Paytm site and select SDK to download. In our case we will select PHP.


Step 2: After clicking on PHP you will be redirect on Github site. Now from git URL download "Paytm Payment Gateway PHP Kit".


Step 3: Copy PaytmKit folder in document root of your server (like /var/www/html)

Step 4: Open config_paytm.php file from the PaytmKit/lib folder and update the below constant values
a) PAYTM_MERCHANT_KEY – Can be downloaded from the Paytm portal. One time downloadable
b) PAYTM_MERCHANT_MID - MID (Merchant ID) can be collected from Paytm team
c) PAYTM_MERCHANT_WEBSITE - Website name can be collected from Paytm team


define('PAYTM_ENVIRONMENT', 'TEST'); // PROD
define('PAYTM_MERCHANT_KEY', 'xxxxxxxxxxxxxxxxxxxxxxxx'); //Change this constant's value with Merchant key downloaded from portal
define('PAYTM_MERCHANT_MID', 'xxxxxxxxxxxxxxxxxxxxxxx'); //Change this constant's value with MID (Merchant ID) received from Paytm
define('PAYTM_MERCHANT_WEBSITE', 'xxxxxxx'); //Change this constant's value with Website name received from Paytm


PaytmKit folder is having following files:


1. TxnTest.php – Testing transaction through Paytm gateway.
2. pgRedirect.php – This file has the logic of checksum generation and passing all required parameters to Paytm PG.
3. pgResponse.php – This file has the logic for processing PG response after the transaction processing.
4. TxnStatus.php – Testing Status Query API


Step 5: Now final step to create a sample html form with required filed, You can also find demo html form in PaytmKit/TxnTest.php.


<?php
    header("Pragma: no-cache");
    header("Cache-Control: no-cache");
    header("Expires: 0");


?>
<!DOCTYPE html PUBLIC "-//W3C//DTD HTML 4.01 Transitional//EN" "http://www.w3.org/TR/html4/loose.dtd">
<html>
<head>
<title>Merchant Check Out Page</title>
<meta name="GENERATOR" content="Evrsoft First Page">
</head>
<body>
    <h1>Merchant Check Out Page</h1>
    <pre>
    </pre>
    <form method="post" action="pgRedirect.php">
        <table border="1">
            <tbody>
                <tr>
                    <th>S.No</th>
                    <th>Label</th>
                    <th>Value</th>
                </tr>
                <tr>
                    <td>1</td>
                    <td><label>ORDER_ID::*</label></td>
                    <td><input id="ORDER_ID" tabindex="1" maxlength="20" size="20"
                        name="ORDER_ID" autocomplete="off"
                        value="<?php echo "ORDS" . rand(10000,99999999)?>">
                    </td>
                </tr>
                <tr>
                    <td>2</td>
                    <td><label>CUSTID ::*</label></td>
                    <td><input id="CUST_ID" tabindex="2" maxlength="12" size="12" name="CUST_ID" autocomplete="off" value="CUST001"></td>
                </tr>
                <tr>
                    <td>3</td>
                    <td><label>INDUSTRY_TYPE_ID ::*</label></td>
                    <td><input id="INDUSTRY_TYPE_ID" tabindex="4" maxlength="12" size="12" name="INDUSTRY_TYPE_ID" autocomplete="off" value="Retail"></td>
                </tr>
                <tr>
                    <td>4</td>
                    <td><label>Channel ::*</label></td>
                    <td><input id="CHANNEL_ID" tabindex="4" maxlength="12"
                        size="12" name="CHANNEL_ID" autocomplete="off" value="WEB">
                    </td>
                </tr>
                <tr>
                    <td>5</td>
                    <td><label>txnAmount*</label></td>
                    <td><input title="TXN_AMOUNT" tabindex="10"
                        type="text" name="TXN_AMOUNT"
                        value="1">
                    </td>
                </tr>
                <tr>
                    <td></td>
                    <td></td>
                    <td><input value="CheckOut" type="submit"   onclick=""></td>
                </tr>
            </tbody>
        </table>
        * - Mandatory Fields
    </form>
</body>
</html>


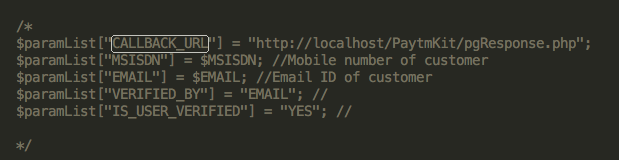
Step 5: Now above form will post on "pgRedirect.php" file in Paytm kit folder. You may also need to add “CALLBACK_URL” in pgRedirect.php. By default it is commented in thsi file. This is that url on paytm will redirect your user. 


$paramList["CALLBACK_URL"] = "http://yourdomain.com/PaytmKit/pgResponse.php";

Here "http://yourdomain.com" will be your website address.


Step 6: Now in "pgResponse.php" file youe can check all status of your transactions.


<?php
header("Pragma: no-cache");
header("Cache-Control: no-cache");
header("Expires: 0");

// following files need to be included
require_once("./lib/config_paytm.php");
require_once("./lib/encdec_paytm.php");

$paytmChecksum = "";
$paramList = array();
$isValidChecksum = "FALSE";

$paramList = $_POST;
$paytmChecksum = isset($_POST["CHECKSUMHASH"]) ? $_POST["CHECKSUMHASH"] : ""; //Sent by Paytm pg

//Verify all parameters received from Paytm pg to your application. Like MID received from paytm pg is same as your application�s MID, TXN_AMOUNT and ORDER_ID are same as what was sent by you to Paytm PG for initiating transaction etc.
$isValidChecksum = verifychecksum_e($paramList, PAYTM_MERCHANT_KEY, $paytmChecksum); //will return TRUE or FALSE string.


if($isValidChecksum == "TRUE") {
    echo "<b>Checksum matched and following are the transaction details:</b>" . "<br/>";
    if ($_POST["STATUS"] == "TXN_SUCCESS") {
        echo "<b>Transaction status is success</b>" . "<br/>";
        //Process your transaction here as success transaction.
        //Verify amount & order id received from Payment gateway with your application's order id and amount.
    }
    else {
        echo "<b>Transaction status is failure</b>" . "<br/>";
    }

    if (isset($_POST) && count($_POST)>0 )
    {
        foreach($_POST as $paramName => $paramValue) {
                echo "<br/>" . $paramName . " = " . $paramValue;
        }
    }
    

}
else {
    echo "<b>Checksum mismatched.</b>";
    //Process transaction as suspicious.
}

?>