Showing posts with label android. Show all posts

Monday, December 28, 2020

React Native Vector Icons

React Native Vector Icons is the best react native libraries to get icons. Here you can see the list of a lot of icons. You can use this for buttons, logos, and nav/tab bars. This is easily customizable. It has 3K+ icons.


Please review below git URL for more information 
(https://github.com/oblador/react-native-vector-icons) -


You can install this with the help of below command -
npm install --save react-native-vector-icons

Now please follow the instructions mentioned on below URL -
https://github.com/oblador/react-native-vector-icons#installation


How to apply - After successfully installation please follow the below steps -

Import below line -
import Icon from 'react-native-vector-icons/Ionicons';


Add icons on your view -
<Icon name="ios-person" size={20} color="#0BB4E4" />

here "ios-person" is the icon name.


Sharing some icons and their names which you can also find on below URL -
https://oblador.github.io/react-native-vector-icons/

stepforward, stepbackward, forward, banckward, caretright, caretleft, 
caretdown, caretup, rightcircle, leftcircle, upcircle, downcircle, 
rightcircleo, leftcircleo, upcircleo, downcircleo, verticleleft, 
verticleright, back, retweet, retweet, shrink, arrowsalt, doubleright,
doubleleft, arrowdown, arrowup, arrowright, arrowleft, down, up, right, 
left, minussquareo, minuscircle, minuscircleo, minus, pluscircleo, 
pluscircle, plus, infocirlce, infocirlceo, info, exclamation, 
exclamationcircle, exclamationcircleo, closecircle, closecircleo, 
checkcircle, checkcircleo, check, close, customerservice, creditcard, 
codesquareo, book, barschart, bars, question, questioncircle, 
questioncircleo, pause, pausecircle, pausecircleo, clockcircle, 
clockcircleo, swap, swapleft, swapright, plussquareo, frown, menufold, 
mail, link, areachart, linechart, home, laptop, star, staro, filter, 
meho, meh, shoppingcart, save, user, videocamera, totop, team, sharealt, 
setting, picture, phone, paperclip, notification, menuunfold, inbox, 
lock, qrcode, tags, tagso, cloudo, cloud, cloudupload, clouddownload, 
clouddownloado, clouduploado, enviroment, enviromento, eye, eyeo, 
camera, camerao, windows, export2, export, circledowno, circledown, hdd, 
ie, delete, enter, pushpino, pushpin, heart, hearto, smile-circle, 
smileo, frowno, calculator, chrome, github, iconfontdesktop, 
caretcircleoup, upload, download, piechart, lock1, unlock, windowso, 
dotchart, barchart, codesquare, plussquare, minussquare, closesquare, 
closesquareo, checksquare, checksquareo, fastbackward, fastforward, 
upsquare, downsquare, leftsquare, rightsquare, rightsquareo, 
leftsquareo, down-square-o, up-square-o, play, playcircleo, tag, tago, 
addfile, folder1, file1, switcher, addfolder, folderopen, search1, 
ellipsis1, calendar, filetext1, copy1, jpgfile1, pdffile1, exclefile1, 
pptfile1, unknowfile1, wordfile1, dingding, dingding-o, mobile1, 
tablet1, bells, disconnect, database, barcode, hourglass, key, flag, 
layout, printer, USB, skin, tool, car, addusergroup, carryout, 
deleteuser, deleteusergroup, man, isv, gift, idcard, medicinebox, 
redenvelopes, rest, Safety, wallet, woman, adduser, bank, Trophy, 
loading1, loading2, like2, dislike2, like1, dislike1, bulb1, rocket1, 
select1, apple1, apple-o, android1, android, aliwangwang-o1, 
aliwangwang, pay-circle1, pay-circle-o1, poweroff, trademark, find, 
copyright, sound, earth, wifi, sync, login, logout, reload1, message1, 
shake, API, appstore-o, appstore1, scan1, exception1, contacts, 
solution1, fork, edit, form, warning, table, profile, dashboard, 
indent-left, indent-right, menu-unfold, menu-fold, antdesign, 
alipay-square, codepen-circle, google, amazon, codepen, facebook-square, 
dropbox, googleplus, linkedin-square, medium-monogram, gitlab, 
medium-wordmark, QQ, skype, taobao-square, alipay-circle, youtube, 
wechat, twitter, weibo, HTML, taobao-circle, weibo-circle, weibo-square, 
CodeSandbox, aliyun, zhihu, behance, dribbble, dribbble-square, 
behance-square, file-markdown, instagram, yuque, slack, slack-square

Saturday, December 26, 2020

Best React Native Libraries and Component

 1. NativeBase - This provides great UI components for React Native and Vue Native apps. This also supports platform specific design. This is a fully open source. It provides some build-in paid/free themes which are available on its market place. 

NativeBase


2. Teaset - This is a UI library to React Native apps, it gives us 20+ pure JS(ES6) components, focusing on content display and action control. You can find more details on Github.

Teaset


3. Material Kit React Native - This provides free React Native Apps templates. This provides a large number of components and cards. This has a lot of components to build a great UI of your app. It provides pixel perfect screens. You can view the documentation on this link - https://demos.creative-tim.com/material-kit-react-native/docs/?_ga=2.234190430.1994806609.1608998238-98775155.1608998238#/. 

Material Kit React Native


4. React Native Elements - This is easy to use and supports Expo too. We can also easily customize it's components. Some components names are below -

Avatar, Badge, BottomSheet, Button, ButtonGroup, Card, CheckBox, Divider, Header, HTML style headings, Icon, Image, Input, ListItem, Overlay, Pricing, Rating, SearchBar, Slider, Social Icons / Social Icon Buttons, Tile, Tooltip

React Native Elements


5. Lottie for React Native - This is a good library to add animations into the Apps. 

Lottie for React Native


Saturday, June 8, 2019

How to add slider in flutter


You can add slider in flutter with the help of “intro_slider” plugin. To integrate this please follow below steps -


Add below line in your pubspace.yam file -

dependencies:
  intro_slider: ^2.2.0


Now click on “Package get” option from top section to get this package in your app.


Now, Import below package in your file -

import 'package:intro_slider/intro_slider.dart';


Note - Make sure to add your images in pubspace.yaml file like this -

assets:
  - assets/images/photo_eraser.png
  - assets/images/photo_pencil.png
  - assets/images/photo_ruler.png


Slider images for Android and iOS


Create a new class as below -

import 'package:flutter/material.dart';
import 'package:intro_slider/dot_animation_enum.dart';
import 'package:intro_slider/intro_slider.dart';
import 'package:intro_slider/slide_object.dart';


class TutorialScreen extends StatefulWidget{

  TutorialScreen({Key key}) : super(key: key);

  @override
  TutorialScreenState createState() => new TutorialScreenState();

}


class TutorialScreenState extends State<TutorialScreen>{
  List<Slide> slides = new List();

  @override
  void initState() {
    super.initState();

    slides.add(
      new Slide(
        title: "ERASER",
        description: "Allow miles wound place the leave had. To sitting subject no improve studied limited",
        pathImage: "assets/images/photo_eraser.png",
        backgroundColor: Color(0xfff5a623),
      ),
    );
    slides.add(
      new Slide(
        title: "PENCIL",
        description: "Ye indulgence unreserved connection alteration appearance",
        pathImage: "assets/images/photo_pencil.png",
        backgroundColor: Color(0xff203152),
      ),
    );
    slides.add(
      new Slide(
        title: "RULER",
        description:
        "Much evil soon high in hope do view. Out may few northward believing attempted. Yet timed being songs marry one defer men our. Although finished blessing do of",
        pathImage: "assets/images/photo_ruler.png",
        backgroundColor: Color(0xff9932CC),
      ),
    );
  }

  void onDonePress() {
    // Do what you want
  }

  @override
  Widget build(BuildContext context) {
    return new IntroSlider(
      slides: this.slides,
      onDonePress: this.onDonePress,
    );
  }

}


Now call this from your main.dart file by using below code -

class MyApp extends StatelessWidget {
  // This widget is the root of your application.
  @override
  Widget build(BuildContext context) {
    return MaterialApp(
      title: 'Flutter Demo',
      theme: ThemeData(
        primarySwatch: Colors.blue,
      ),
      home: TutorialScreen(),
      debugShowCheckedModeBanner: false
    );
  }
}


This plugin have many options you can check all available options on below urls -


How to change project name in flutter


Solution for Android -

This is very simple in flutter, If you want to change the project name which will display on the mobile app. First, open your project in android studio or in any editor and then navigate to android/app/src/main/AndroidManifest.xml 


After this, you have to change the label value in AndroidManifest.xml  for android:label 

<application
    android:name="io.flutter.app.FlutterApplication"
    android:label=“APP Name”
    android:icon="@mipmap/ic_launcher">


Just replace “APP Name” with your app name. Now run your project in android simulator/device. 
Note - If changes are not updating then please uninstall your existing build and install again.


Solution for iOS - To update app name in iOS you just need to navigate on below location - 

ios/Runner/Info.plist


Now search for “CFBundleName” in Info.plist file and replace its value with your app name. Please check below example - 

<key>CFBundleName</key>
<string>APP Name</string>

Now, Run the app in simulator/Device. This will update your app name.

Note - Same as Android if the app name is not updating then please uninstall your existing build and install again.


This will update the app name for both (Android and iOS). 

Saturday, May 25, 2019

How to disable "Google Play Protect"?


Recently Google has added some security system updates. This not allow the app to install outside from Google pay. That is called the “Play Protect”. Google did this to manage some security futures. To prevent this you need to follow the below steps to disable Google Play Protect related to Google Play. To disable this please follow below steps - 

Step 1 - Open play store application from your device. Check the below screen.


Step 2 - Tap on the menu button. Check the below screen.


Step 3 - Select “Play protect” option from the menu list. Check the below screen.


Step 4 - Now disable the “Scan device for security threads”. Check the below screens.


In short, you need to follow this -

Open "Play Store" App in your mobile => Tap on Menu button from left side => Select "Play Protect" option in menu list => Now, Disable the options "Scan device for security threats".

Now you will be able to install your development app.


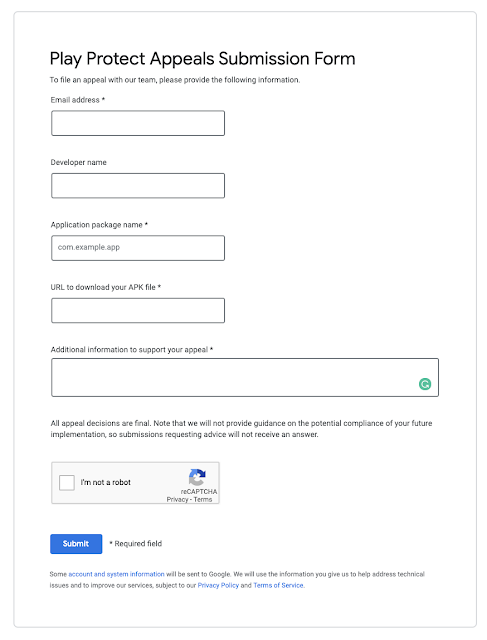
This has other permanent solution - You need to submit your app to Google for review on below URL then after few days this problem will be fixed for your app.


Play Protect Appeals Submission Form URL -  https://support.google.com/googleplay/android-developer/contact/protectappeals


Tuesday, March 19, 2019

No toolchains found in the NDK toolchains folder for ABI with prefix: mipsel-linux-android


This error comes due to NDK version mismatch, To resolve this error you have to download an older version of NDK and need to remap NDK path. Then you can build the project successfully. To do this please follow the below steps -

1. First, you need to open the NDK downloader page. You can open by using below URL -
https://developer.android.com/ndk/downloads/

2. Now at the bottom of this page, you can see "older versions of the NDK" and click on "NDK Archives" tag to see all older versions.


3. Agree with the Terms from this page by clicking on "I agree to the terms" button. After this, you can see all older versions of NDk.


4. Download your NDK older version from this list. In my case, it was "Android NDK, Revision 14b".


5. Open Android NDK location directory. You can check location from File -> Project Structure -> SDK location. Check below image for more information -


6. Now, Extract file which you have downloaded and move that folder in toolchains folder - (Or you can delete toolchain folder and past our recent downloaded toolchain on this location)


7. After this, you need to rebuild the project. 


This will resolve your issue. In some case, you can also try below solution -

Open Android Studio and go to File -> Project Structure -> SDK location, uncheck NDK If you do not need this, and then restart android studio. This will resolve your issue.


Please post a comment if you are still having an issue in this. I will try to resolve that issue.

Monday, January 21, 2019

Could not find an installed version of Gradle either in Android Studio, or on your system to install the gradle wrapper. Please include gradle


CordovaError: Could not find an installed version of Gradle either in Android Studio,
or on your system to install the gradle wrapper. Please include gradle


To solve this issue you have to install gradle. To install gradle please use below steps -

For debian/ubuntu - If your system is a debian/ubuntu then, in this case, you can use below command on the terminal to install gradle. 
sudo apt-get install gradle


For Mac - If your system is a Mac then follow below steps -  

First, download the gradle binary only distribution with the help of this URL - https://gradle.org/gradle-download/
Now open your system terminal and run the following command to unzip the android sdk into the development directory that is under your user home directory
unzip ~/Downloads/gradle-3.1-bin.zip -d ~/Development

To edit base profile open vi editor. We also need to set GRADLE_HOME environment variable 
vi ~/.bash_profile

To enter in edit mode in vi editor hit i and now add below text to .bash_profile
export GRADLE_HOME=~/Development/gradle-3.1/bin

To exit edit mode press Esc key 
To enter in command mode press : (colon key)

To save changes and exit vi editor type wq and press enter key.

To update changes run the following command 
source ~/.bash_profile

Now test this by running below command in terminal 
echo $GRADLE_HOME

For Windows - If your system is a Windows then follow below steps -   
This is a very long process, Here are some steps for windows. Just follow all steps mentioned on below URL -
http://bryanlor.com/blog/gradle-tutorial-how-install-gradle-windows

Sunday, December 16, 2018

Failed to find 'ANDROID_HOME' environment variable


I am getting below error when I am trying to run project -

> cordova build android
Android Studio project detected
(node:15997) UnhandledPromiseRejectionWarning: Unhandled promise rejection (rejection id: 1): Failed to find 'ANDROID_HOME' environment variable. Try setting it manually.
Failed to find 'android' command in your 'PATH'. Try update your 'PATH' to include path to valid SDK directory.


To resolve this issue please run below commands in the terminal -

export ANDROID_HOME="/Users/chetandeshmukh/Library/Android/sdk"
export PATH="$ANDROID_HOME/platform-tools:$ANDROID_HOME/tools:$PATH"


How to find the Android SDK path?

First open android studio, Then click on SDK manager. For more info please check below image -


Now select Appearance & Behavior -> System Settings -> Android SDK


 Now copy your SDK location with the help of the above steps and update in command.


This process will set the Android Home path in your system.


Now try once again to run your project. This process will resolve your problem. If you still facing any issue please add your error in the comment section. We will resolve this. 

Tuesday, November 27, 2018

Could not find play-services-tasks-license.aar (com.google.android.gms:play-services-tasks-license:11.8.0)


Could not find play-services-tasks-license.aar (com.google.android.gms:play-services-tasks-license:11.8.0).
Searched in the following locations:
    https://jcenter.bintray.com/com/google/android/gms/play-services-tasks-license/11.8.0/play-services-tasks-license-11.8.0.aar


Please follow below steps to solve this issue:-


Go to build.gradel 


and replace this -

buildscript {
    repositories {
        mavenCentral()
        jcenter()
    }
}

with this -

buildscript {
    repositories {
        google()
        mavenCentral()
        jcenter()
    }
}


And replace this - 

allprojects {
    repositories {
        mavenCentral();
        jcenter()
    }
}


With this -

allprojects {
    repositories {
        google()
        mavenCentral();
        jcenter()
    }
}


Now - Click on “Sync Now”


If you again face this issue - 

A problem occurred evaluating root project 'android'. > Could not find method google() for arguments [] on repository container of type org.gradle.api.internal.artifacts.dsl.DefaultRepositoryHandler.


To resolve this issue add this line in your gradel file -

dependencies {
        classpath 'com.android.tools.build:gradle:3.0.1'
    }


If you are having this issue in react native app. Please use this below lines in your gradel file -


buildscript {
    repositories {
        jcenter()
        google()
    }
    dependencies {
        classpath 'com.android.tools.build:gradle:3.0.1'
    }
}
allprojects {
    repositories {
        mavenLocal()
        jcenter()
        maven {
// All of React Native (JS, Obj-C sources, Android binaries) is installed from npm
            url "$rootDir/../node_modules/react-native/android"
        }
        google()
    }
}


Make sure to sync your project after doing all this. This will resolve your issue.